LaTeX Pictures

LaTeX Pictures
Version 3.03
June 8, 2023
About LaTeX Pictures
The LaTeX Pictures.ipf and LaTeX Palettes.ipf procedure files implement a user interface for creating high-quality typeset mathematical equations using the LaTeX markup language.
Igor 7 or later is required. No installation of any LaTeX-related software is required, but an active and working internet connection is. If your copy of Igor can open this url, your internet connection should be fine:
Print FetchURL("http://www.wavemetrics.net")[0,60]
CodeCogs - An Open Source Scientific Library
The pictures are rendered by the online API for the CodeCogs Equation Editor at:
https://editor.codecogs.com/docs/4-LaTeX_rendering.php
Please comply with their Fair Usage Policy:
https://editor.codecogs.com/support/3-fair_usage.php/

Picture Formats
The LaTeX markup is rendered into PNG or (on Macintosh) PDF or (on Windows) PNG format and inserted into Igor annotations or drawn with DrawPICT (Igor's drawing tools). Igor 9 and later can also use PDF on Windows.
Installation
Place everything in your Igor Pro <version> Users folder, inside the "User Procedures" sub folder.
Select "Show Igor Pro User Files" from Igor's Help menu.
Move the following items into the now-visible "User Procedures" folder:
- LaTeX Palettes (folder)
- LaTeX Palettes.ipf (procedure file)
- LaTeX Pictures.ipf (procedure file)
LaTeX Syntax
See the "LaTeX Help" button in the panel and search online for "LaTeX math mode syntax" to learn what kinds of
LaTeX commands will work with this implementation.
(There are some quirks about extra backslashes to get the right number of backslashes through Igor's command language and all the way across the internet to the LaTex renderer, but using the LaTeX Pictures Panel should allow you to ignore this issue.)
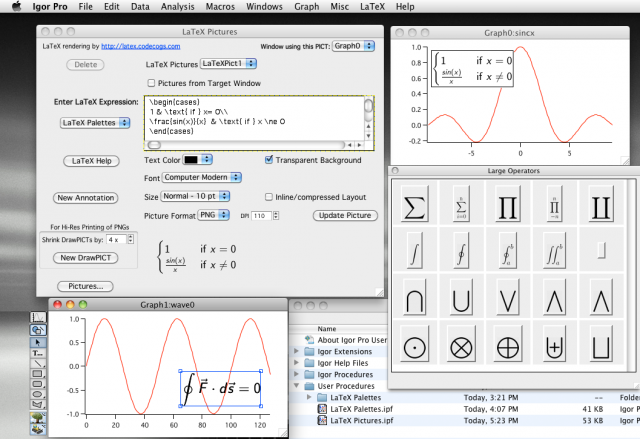
Using the LaTeX Pictures Panel
To open the LaTeX Pictures panel, enter the following in your Igor experiment's Procedure window:
#include "LaTeX Pictures"
Close the Procedure window (or click Compile).
A new LaTeX menu should appear.
Choose "LaTeX Pictures" from the menu.
Either enter the LaTeX markup text directly into the "Enter LaTeX Expression" area or click the "LaTeX Palettes" popup to first load and then select the LaTeX palette(s) to build up an expression.
Bring the Graph, Layout, or Panel window you want to add the LaTeX picture to to the front, then click either New Annotation (or New DrawPICT).
To add equations to Notebook windows, use the Copy Picture button and then paste into the Notebook.
Choose "_new_" from the LaTeX Pictures popup menu to start editing a new equation.
You can select a previously created equation from the same popup menu.
If you change the LaTeX markup text manually, you'll need to click the Update Picture button, but other settings update immediately if you have LaTeX Auto Update checked in the LaTeX menu. Unlike graphs, layouts or panels, notebook equations do not update when you modify a LaTeX Picture this way.
Using LaTeX Palettes
Clicking in a palette inserts the markup into the expressions area. Some markups incorporate the selected text into the result.
For example:
- Type "x^2+y^2" into the "Enter LaTeX Expression" area. This is LaTeX markup for exactly what you think it is.
- Now select what you just typed.
- Choose the "Accents and Bars" palette, scroll down to the square root of x+y.
- Click the square root of x+y item.
- Your selection is transformed into "\sqrt{x^2+y^2}", and the resulting picture is shown.
If you look at the bottom of the "Accents and Bars" palette, you'll see that the LaTeX markup is shown as "\sqrt{#x+y#}", which is non-standard LaTeX.
I've used the # symbol to delimit the part that gets replaced by the selected text. (If there's no selection only the # symbols are removed.)
Customizing LaTeX Palettes
You can make your own palettes or amend the palettes I've provided. The LaTeX Palettes procedure has a ShowLaTeXPaletteCreator() function that implements a VERY rudimentary interface.
Adding rows and columns or rearranging items is best done with the "Show LaTeX Table" button. Enter the LaTeX into the table, then re-select the "category" (palette) to fix the listbox selection wave.
Don't forget to add # characters around what should be replaced by any current selection.
Click the "Render all Cells from Plane 1" to render all the markup to CodeCogs (the resulting pictures are stored in Plane 0).
Compatibility
PNG is most compatible between Macintosh and Windows.
PDF is supported by Igor 6 or later on Macintosh and on Igor 9 and later on Windows.
Because PNG is only a bitmap format, you might want to render a large bitmap and shrink it down to preserve sharpness when printing at high resolution. That's what the "Shrink DrawPICTs by" setting is for.
Project Details
Current Project Release
LaTeX Pictures 3.03
| Release File: | LaTeX Pictures 3.03.zip (179.45 KB) |
| Version: | 3.03 |
| Version Date: | |
| Version Major: | 3 |
| Version Patch Level: | 03 |
| OS Compatibility: | Windows Mac-Intel |
| Release Notes: |
Version 3.03 updates URLs pointing to CodeCogs. |

Forum

Support

Gallery
Igor Pro 10
Learn More
Igor XOP Toolkit
Learn More
Igor NIDAQ Tools MX
Learn More
Nicely done. I am finding that the Sans (sic) Serif font choice shows up as serif (see the picture). Also, the header says comic sans was removed but these code lines remain ...
Based on CodeCoges setFont command, the default font family is Latin Modern, which is serif IIRC. The improvement to the font family selection is as below.
March 29, 2023 at 01:19 pm - Permalink
Thanks, Jeff! I've made those changes and made Latin Modern the default font.
March 31, 2023 at 02:09 pm - Permalink
Just a brief update on the fair usage - the new link is https://editor.codecogs.com/support/3-fair_usage.php
Also - it would be great if this was integrated into all text-items in Igor, eg. annotations in graphs etc...
June 8, 2023 at 04:28 am - Permalink
I've updated the help file with the revised links.
I have added the fair usage to the procedure windows that implement LaTeX Pictures.
As to the "integrate" suggestion, perhaps you mean integrate true LaTeX into annotations, etc?
Igor 8 does have a subset of LaTex built-in:
DisplayHelpTopic "Igor TeX"
June 8, 2023 at 03:43 pm - Permalink